Last updated on September 25, 2019

As with most things, this is a solution to solve the problem that I have. My home has an unfortunate problem: zero insulation. Before you go down the road of suggestions, trust me, it’s not an option for my property until I can afford to do a remodel. As a result, my natural drive of efficiency has forced me to try to improve the heating system as much as I can. In comes Home Assistant to the rescue. Originally I had a [completely] manually operated forced-air heating system with every room/area that had a single duct, regardless of the room size, and you had to manually control the odd-sized 10″ x 14″ register to adjust the airflow. All of that was driven by a single point mercury thermostat from the ’80s which was placed in the rarely occupied dining room. As a result, if you had all vents open, the living room would get hottest as it’s closest to the heater unit, while our bedroom and guestroom would be a good 15 degrees lower when the dining room reached its set point.
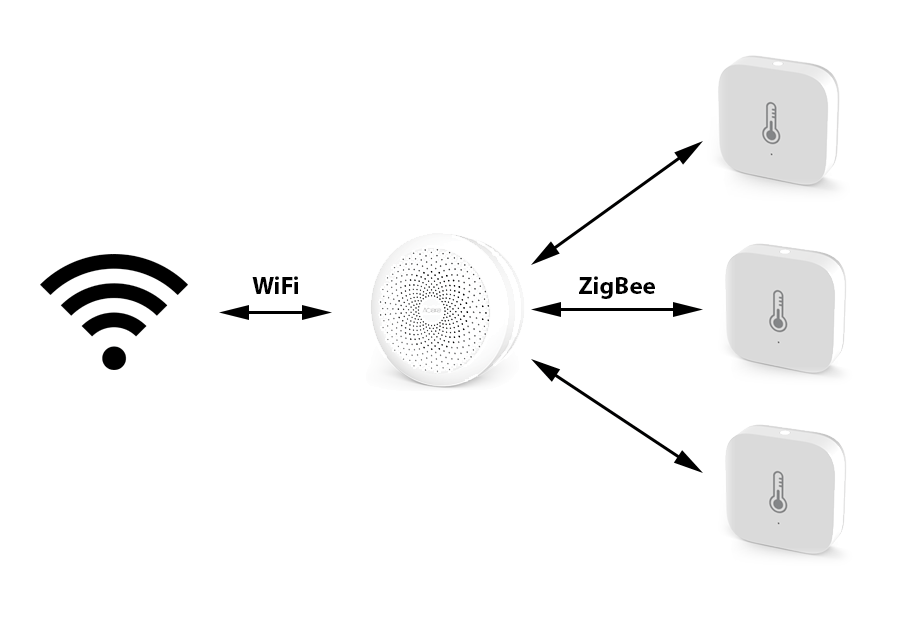
So after more years of living with this system than I’d like to admit, I decided to solve the problem. My idea was to make a multi-sensor system that would allow me to drive the heating system based on a selected room input. This began the drive to find the best/most cost-effective system for monitoring room temps across many rooms. As I already had a Xiaomi Aqara hub, it’s temp and humidity sensors offered the best expansion for my existing system. These are just the sensors I choose, but ultimately you can use any sensor that gives you a temperature datapoint.
Once I had my hardware picked out, I added them through the Xiaomi Gateway component. After you have the gateway added to your HA config, any and all new sensors/device need to be paired to the gateway. I’ve found that it’s easiest for me to do this via the Xiaomi Mi Home app. I have been very surprised with the reliability of the hub integration as I’ve never had it fail to issue a command. I did have a single temp sensor that was a bit flaky, but the hub has been great.
Next, I went to implementing the software. What I ultimately wanted is a way for my heating system based on the room(s) that I was occupying. What I came up with is a generic climate sensor that follows the various temp sensors that I’ve configured. So here I will walk you through the example of how I have it configured. I have had this working great for the last year or so, so let me know if you run into issues.
Here is my entire climate.yaml package file:
|
1 2 3 4 5 6 7 8 9 10 11 12 13 14 15 16 17 18 19 20 21 22 23 24 25 26 27 28 29 30 31 32 33 34 35 36 37 38 39 40 41 42 43 44 45 46 47 48 49 50 51 52 53 54 55 56 57 |
input_select: heater_target_sensor: name: Heater target sensor options: - Living Room - Guest Bedroom - Master Bedroom icon: mdi:radiator binary_sensor: - platform: template sensors: heater_target_seleceted_living_room: friendly_name: "Living Room" value_template: "{{ is_state('input_select.heater_target_sensor', 'Living Room') }}" - platform: template sensors: heater_target_seleceted_master_bedroom: friendly_name: "Master Bedroom" value_template: "{{ is_state('input_select.heater_target_sensor', 'Master Bedroom') }}" - platform: template sensors: heater_target_seleceted_guest_bedroom: friendly_name: "Guest Bedroom" value_template: "{{ is_state('input_select.heater_target_sensor', 'Guest Bedroom') }}" sensor: - platform: template sensors: heater_target_sensor_template: friendly_name: "Heater target sensor" unit_of_measurement: "°F" value_template: >- {% if is_state('input_select.heater_target_sensor', 'Master Bedroom') %} {{ states.sensor.master_bedroom_temperature.state | float }} {% elif is_state('input_select.heater_target_sensor', 'Guest Bedroom') %} {{ states.sensor.guest_bedroom_temperature.state | float }} {% elif is_state('input_select.heater_target_sensor', 'Living Room') %} {{ states.sensor.living_room_temperature.state | float }} {% endif %} climate: - platform: generic_thermostat name: Heater heater: switch.heater_heat target_sensor: sensor.heater_target_sensor_template min_temp: 55 max_temp: 72 ac_mode: False target_temp: 68 cold_tolerance: 1 hot_tolerance: 2 away_temp: 55 precision: 0.1 min_cycle_duration: minutes: 20 |
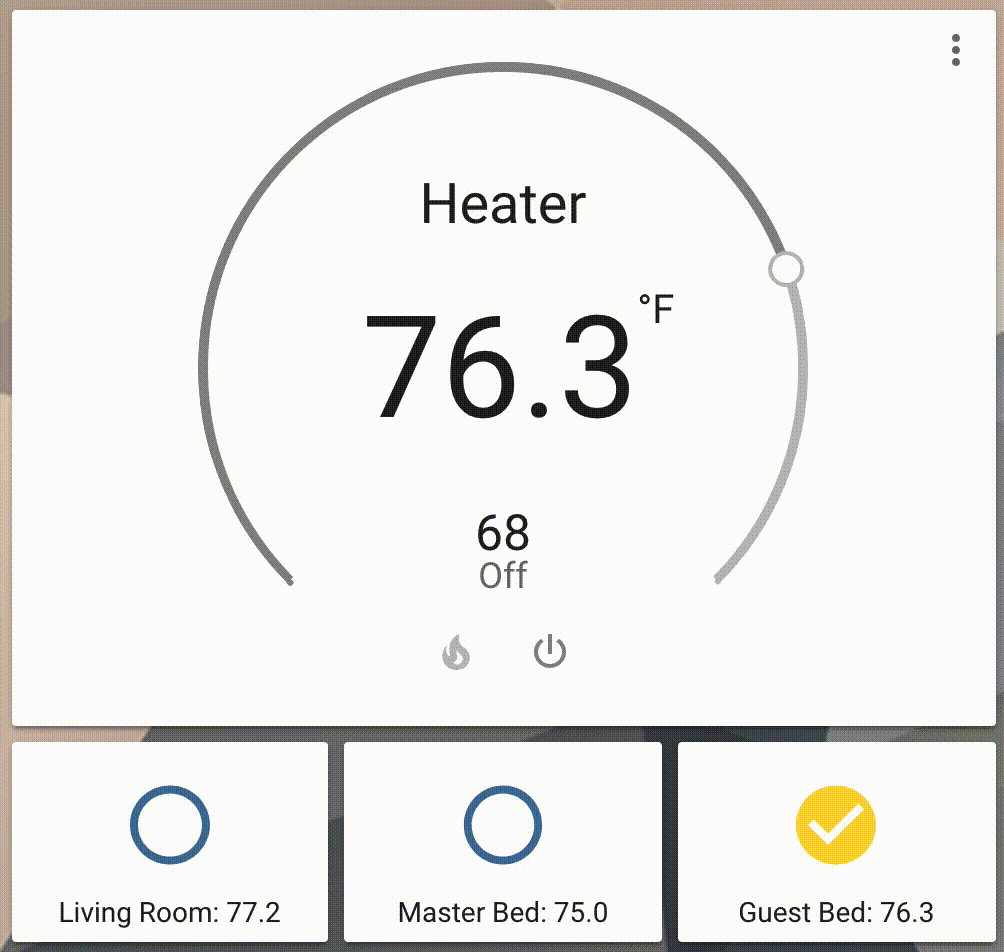
The basic system is that you define a number input selects which matches the number of temperature sensors you have to drive the heating system. For me, this was three rooms consisting of a living room, guest bedroom, and a master bedroom. Then, you create a single binary target sensor which is on when you select that specific room. Finally, you need a template sensor equal to the value of the temperature of the room you selected in the binary sensor. Based on what the input select is selected to, this will drive a template sensor to define the target temperature of a room. From this final setpoint, we create a climate system that drives to this target.
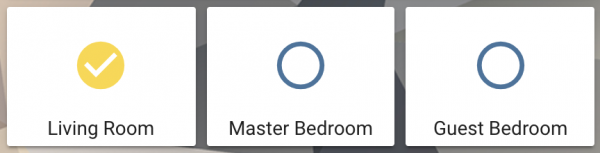
Finally, to make this easy to set, I’ve created a set of buttons that allows me to easily set this via lovelace. The magic is the custom button card. This allows me to show each of my three target sensors and whether they are selected.
|
1 2 3 4 5 6 7 8 9 10 11 12 13 14 15 16 17 18 19 20 21 22 23 24 25 26 27 28 29 30 31 32 33 34 35 36 37 38 39 40 41 42 43 44 45 46 47 48 49 50 51 52 53 |
- type: horizontal-stack cards: - type: custom:button-card entity: binary_sensor.heater_target_seleceted_living_room name_template: > return 'Living Room: ' + states['sensor.living_room_temperature'].state show_state: false tap_action: action: call-service service: input_select.select_option service_data: entity_id: input_select.heater_target_sensor option: Living Room size: 30% styles: card: - height: 100px name: - font-size: 14px - type: custom:button-card entity: binary_sensor.heater_target_seleceted_master_bedroom name_template: > return 'Master Bed: ' + states['sensor.master_bedroom_temperature'].state show_state: false tap_action: action: call-service service: input_select.select_option service_data: entity_id: input_select.heater_target_sensor option: Master Bedroom size: 30% styles: card: - height: 100px name: - font-size: 14px - type: custom:button-card entity: binary_sensor.heater_target_seleceted_guest_bedroom name_template: > return 'Guest Bed: ' + states['sensor.guest_bedroom_temperature'].state show_state: false tap_action: action: call-service service: input_select.select_option service_data: entity_id: input_select.heater_target_sensor option: Guest Bedroom size: 30% styles: card: - height: 100px name: - font-size: 14px |
This config should work for both AC and heat even though I’m only using it as a target for my heating system. Feel free to experiment with various configurations within your lovelace to make it the best setup for your configuration.
In order to automate this target sensor, I have it set via some Node-Red flows to make it automagically set to where I want it, but that’s for another post! Let me know if you want me to go into the details of configuring the Xiaomi sensors.
If you want to support me, buy me a coffee or buy the Xiaomi Hub kit or Temp sensors through my referral links.
As always, feel free to post up questions you come across and I’ll try to help where I can.
How does this solve the problem? If the guest room calls for heat when the living room is at its target, won’t it still increase the temperature of the living room? I always thought you would need to install automated baffles in the air vents to control the amount of airflow, i.e. closing the baffle for the living room while maximizing the guest room was the only workable solution.
This solves my problem of the dining room thermostat. Beuacse of its location, it would always be cooler than every other part of the house. Now, the rooms that I spend time in, are the rooms that are the target for the heater. No individual room is calling for heat here as I only have one forced air system. In the winter, I’ll typically close the bedroom one after I get up.